In the first installment of this series, we walked through the different aspects which influenced my choice of both a CPU and a motherboard for my new computer. Our walk-through ended with me settling on a Ryzen 9 5900X processor, and an MSI MEG X570 Unify motherboard.
In this second part, I will go through my reasoning behind my choices for the CPU cooler and the case.
CPU cooler
Power metrics
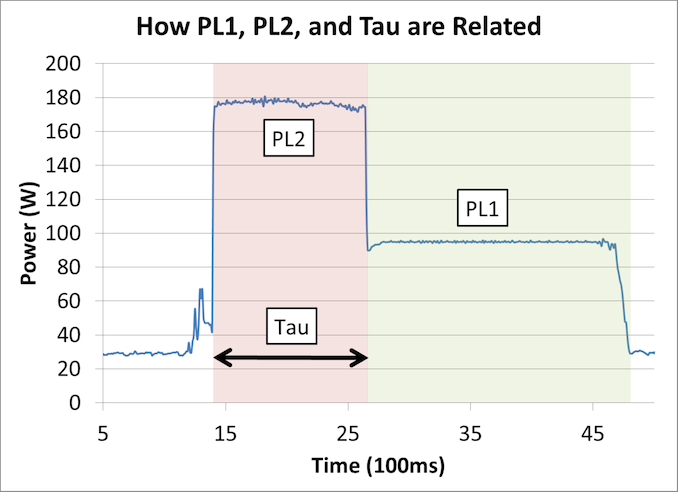
It didn’t take me long to learn that the guiding metric when looking for a CPU cooler, was the CPU’s own Thermal Design Power (or TDP). This metric, also referred to as PL1 (Power Level 1), refers to the maximum amount of heat generated by the CPU under nominal workload1. A CPU’s TDP informs cooling solutions designers about the requirements to consider when designing their systems. However, the TDP alone is not enough, especially when it comes to desktop systems. This is because, such systems implement dynamic frequency scaling technologies. These technologies, also commonly known as Turbo or Boost, allow a the processor, for a limited period, to increase its operating frequency to a higher value than the one it uses for its nominal operation. During these short bursts, the processor’s power draw can reach up to 2.5 folds2 its TDP. This second power limit depends on multiple parameters, among those are23:
- The Turbo Power Limit (TPL) also referred to as PL2 (Power level 2), this is the maximum power deliverable to the CPU during boost.
- The Power Budget Time (Tau), which is the maximum duration during which the TPL is allowed to be delivered to the CPU.
- The Turbo Frequency which is the maximum frequency the processor can reach during turbo.
The values of these parameters are given by the processor’s manufacturer in the CPU’s specification. As mentioned earlier, TPL is usually around 2x TDP, Tau can reach the one minute mark4, and turbo frequencies are usually in the range of few hundred MHz above nominal frequencies.
Other factors such as the voltage-frequency curve of the CPU, and the binning strategy of the CPU and its chiplets also have an effect on the actual power profile during turbo. Furthermore, to make things more confusing, there is a difference in the way AMD and Intel implement turbo5. In fact, the description is closer to the way Intel defines turbo than to AMD’s. This is because Intel was first to introduce turbo to the consumer market all the way back in 2008. This first-mover advantage, in combination with Intel’s market dominance, meant that AMD has always had to play by Intel’s rules and was always catching-up to it. This arguably changed completely with the AMD’s reveal of the Zen micro-architecture. This difference in turbo implementation is important enough to warrant more explanations.
Turbo according to Intel
Turbo Boost is Intel’s implementation of dynamic frequency scaling. During normal operation, the CPU operates at base frequency, and its power draw is maintained at TDP. When a heavy load is received by the CPU, and Turbo is required, the CPU frequency is increased to turbo frequency, as a direct consequence, the power draw increases. The boost is maintained until the Turbo power-budget of the CPU is depleted. This power-budget can be defined as: (PL2 - PL1) * Tau, meaning, this budget reflects the amount of energy the CPU is allowed to draw when in turbo.
- If during turbo, the load is heavy enough that the CPU’s power draw reaches PL2, then the frequency is dropped just enough to avoid surpassing this limit.
- If the power budget is consumed before the load that triggered the turbo is finished, the frequency drops and the CPU goes back to the PL1 level.
The change in the profile during turbo, and relationship between PL1, PL2 and Tau are shown in Figure 13.
A few more things to add about Intel’s Turbo Boost:
- Stock values of PL1, PL2, and Tau, are defined by Intel for its CPUs and given in the CPU specification to motherboard manufacturers. However, Motherboard manufacturers are free to change these values if they believe their motherboards can deliver the power required for longer boosts, and have the thermal performance necessary to dispose of the extra heat. As such, it is not uncommon to see
Tauvalues being set to very large values so that turbo effectively lasts ‘forever’ (i.e., until the turbo load is processed). - The exact frequency used during Turbo depends on the number of loaded cores, and as a general rule, decreases as more cores enter turbo mode. The values used for the turbo frequency in function of the number loaded cores are defined in the Turbo frequencies table which is part of the CPU specification.
- The frequency algorithm is effectively a step function with increments of 100MHz (as of Sandy Bridge processors), and which ranges from the base frequency to the different turbo frequencies (as specified in the turbo frequency table).
- As a consequence of Intel’s binning strategy, every core on the CPU can support the turbo frequency advertised on the box (as we will see in the next section, that is not the case for AMD). This also means that the CPU cores are usually capable of sustaining higher frequencies, just not so, up to Intel’s standards. Effectively, this means that some performance is left on the table, and can only be unlocked through overclocking.
- As of the writing of this article, Turbo Boost is currently in version 3.0.
Turbo according to AMD
Intel’s dominance over the definition of turbo arguably came to an end with AMD’s introduction of Zen in 2017. AMD’s Zen uses a more aggressive turbo algorithm, which allows for a performance curve that follows the silicon’s limitations very closely. On top of the metrics from the previous section, three new metrics define the boost performance, and total power draw of Zen processors:
- Package Power Tracking (PPT): Is the power threshold (in Watts) allowed to be delivered to the CPU socket. In addition to the power drawn by the cores, this power measure includes the power draw of the IO die, the chiplet-to-chiplet as well as the CPU-to-chipset communication, and PCIe and DRAM controller6.
- Thermal Design Current (TDC): This is the maximum current (in Amperes) that can be delivered to the CPU in thermally-constrained scenarios.
- Electrical Design Current (EDC): The maximum current (in Amperes) which can be delivered to the CPU in short-period spike scenarios.
The default values of these three parameters for AM4 CPUs with an advertised TDP of 105W are: PPT=142W, TDC=95A, and EDC=140A.
AMD’s implementation of turbo on Ryzen processors is called Precision Boost. The main difference between AMD’s approach and Intel’s, is how aggressive AMD’s frequency-voltage curve is. As mentioned in the previous section Intel uses its step-function algorithm in order to reach specific turbo frequencies defined in the the processor’s turbo frequencies table. In contrast, AMD’s algorithm considers the previous three metrics, in combination with the CPU’s maximum boost frequency and current temperature in order to determine the boost frequency to use7. These parameters are defined as follows:
- Stock values for the PPT, TDC, and EDC parameters are specified by AMD, with the motherboard manufacturers having the freedom to use different values as they see fit. Values of these parameters can also later be modified by the user through the motherboard’s firmware.
- The maximum turbo frequency is a set constant for the CPU as advertised on the box, during turbo, this value will not be surpassed.
Furthermore, Precision Boost uses a 25MHz frequency increment, which compared to Intel’s Turbo Boost’s 100MHz increment, allows the processor to spend a longer time in higher frequencies. Finally, the fact that the temperature also plays an important role in the determination of the effective turbo frequency means that opting for a high-end/premium cooling solution will result in noticeable performance improvements.
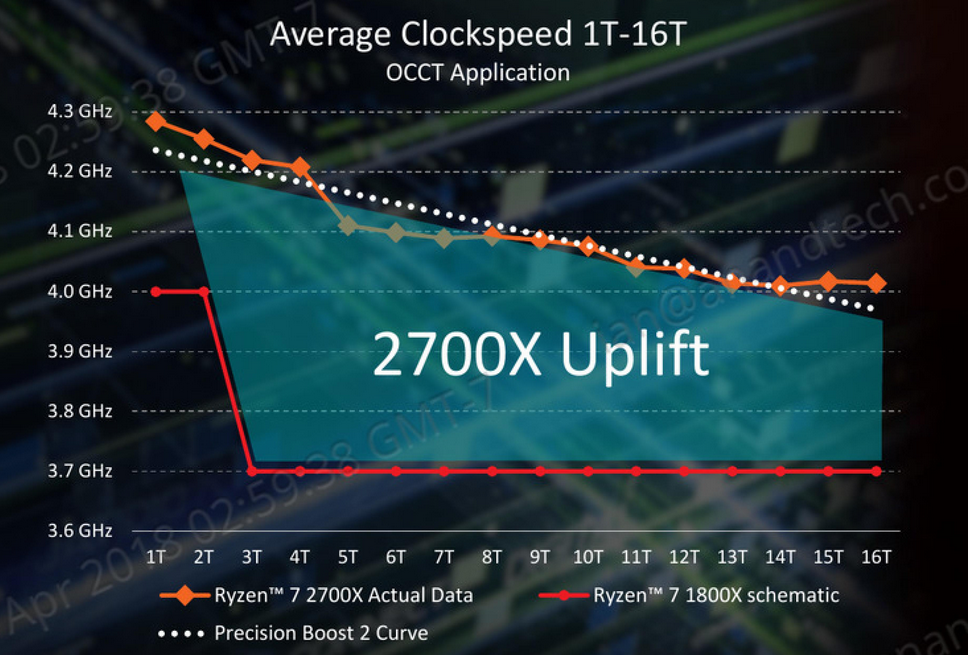
As of this writing, Precision Boost is in version 2, which is supported on Zen+ processors and later. The main improvement of version 2 in comparison to version 1, is the optimization of the frequency algorithm in function of the number of the loaded cores. The difference between the two frequency algorithms is showcased in Figure 25. Precision Boost version 1 significantly drops the boost frequency when the processors is loaded with more than two turbo threads (Red curve in Figure 2). On the other hand, Precision Boost version 2, allows for a gradual and almost linear drop in the boost frequency as more turbo threads are loaded on the processor (Yellow curve in Figure 2). According to AMD, the frequency gain of this more aggressive curve ranges from 300 to 500MHz8.
Another fact which impacts turbo performance is the change in AMD’s binning strategy as of Zen2 processors5. The main change is AMD performing binning per core, requiring only one of the cores in the CPU to reach the advertised turbo frequency of the CPU. This effectively means two things:
- Every CPU will clearly have one best core which can support higher turbo frequencies and which will be the first to be assigned heavy workloads. I am not sure how this is not a bad thing, as this would imply a (slight) extra load for the scheduler, since heavy loads would not be sent to whichever core is available (as is the case with Intel). Additionally, the best core might end up being subject to more electro-migration than the remaining cores on the CPU. Obviously, these are things that AMD has considered in its binning strategy and feels confident enough about, so I am probably missing some additionally aspect here.
- Overall, the CPU will be working very closely to the silicon’s maximum performance. This is a good thing in my opinion, as it means less performance is left on the table, and no manual over-clocking is required to unlock it.
Finally, I have not touched on two more turbo-related technologies present on (as of this article) current AMD processors:
- Precision Boost Overdrive (PBO): which allows the processor to achieve an even higher (multi-core) turbo-frequency (though not higher than the advertised turbo frequency). PBO plays on the three metrics: PPT, TDC, and EDC and increases their values. As such, the effect on frequency is indirect. PBO 2 which was released for Ryzen 5000 processors, improves on this by dynamically adjusting the under-voltage which is inherent to dynamic frequency scaling. This allows for the frequency gain to occur under low loads as well as it does under high ones9.
- Auto-Overclock (Auto-OC): which boosts the single-core maximum turbo frequency by 200MHz. Reaching this new maximum value is however not guaranteed by AMD.
I have not covered these technologies mainly because they bring in even more complexity to the discussion. Additionally, Precision Boot already does such a good job of extracting the most performance out of the CPU, that the performance improvements brought by these two technologies seem to be very limited7. Finally, neither of these technologies is enabled out of the box, and neither is covered by AMD’s warranty.
Summary and lessons learned
The previous discussion about the different current turbo technologies remains very incomplete. At the same time, it is clearly over-detailed when we remember my starting point of simply trying to find a cooling solution for my future build. The topic of power consumption, and turbo technologies seems to be very muddy, and I was left with more questions than at the start of my search. With that being said, here were my takeaways:
- The TDP value advertised on the CPU box is simply not complete and does not consider turbo.
- The way AMD implements turbo on its Zen micro-architecture is very different from Intel’s: It allows the CPU to work much closer to its performance limit without the need for manual over-clocking.
- The previous point comes at a price: A very stable motherboard and very performant cooling solution are required.
With those takeaway, my target was now a high-end cooler, with a TDP of at least double that which is advertised for my CPU. As a reminder, the Ryzen 9 5900X CPU I have settled on previously, boasts a TDP of 105W.
Water coolers
From the very early stages of my build, I knew I wanted a water cooling solution. Looking more into the subject, I quickly learned that there are two kinds of water coolers:
- All In One loops (AIOs): These are out-of-the-box-ready products. All elements of the loop (pump, radiator, tubing) are already assembled, the loop is already filled with cooling liquid, and all that is left to do is to mount the fans and connect the electric wiring.
- Custom loops: In this case, the elements of the loop can be purchased separately, are delivered without assembly, and it is up to the user to connect the different building blocks of the cooler, fill in the cooling liquid, and mount the complete loop. This usually requires larger cases and presents extra work, in return, these solutions allow for a lot more flexibility.
In my case I wasn’t ready to open the Pandora’s box that is the world of custom loops. Additionally, As this is my first build, I have no experience in mounting my own custom loop, and the risk of missing something up and ending up with a leak was not negligible. Finally, knowing I was going to go with a compact case later, I decided to go for an AIO solution.
The next thing to settle on was the size of the cooler. A cooler’s size refers to the length of its radiator, and specifically to the size and number of fans it has space for. This size is equal to the number of fans mounted on the radiator multiplied by the size of a single fan, with water cooler fans being of either 120 or 140mm in diameter. As such, coolers are usually of sizes: 120, 240, 360 (respectively 1, 2 and 3 fans of size 120mm) and 140, 280 or 420mm (1, 2, or 3 fans of size 140mm). The bigger the cooler size, the higher its performance. An additional aspect to consider is that larger fans have a lower noise profile than smaller ones10. However, bigger coolers require larger cases, as they require to be mounted directly on one of the case’s panels.
In order to guide my decision regarding the cooler’s size, I tried to find information about the expected TDP capacity for the different sizes. I was disappoint to discover that I simply could not find such information. All specification sheets I came across only mentioned the fan speed, noise level, and radiator dimensions, but no expected TDP capacity. I understand that exact TDP values for a certain cooler size would vary from one manufacturer to the other, and that even for a set model the observed TDP would be dependent on the testing environment. As such, I did not expect values applicable to every scenario, and every manufacturer out there, but I was expecting at least reference values, in an industry-agreed-upon standard scenario. To my disappointment, and to the extent of my research, no such figures exist.
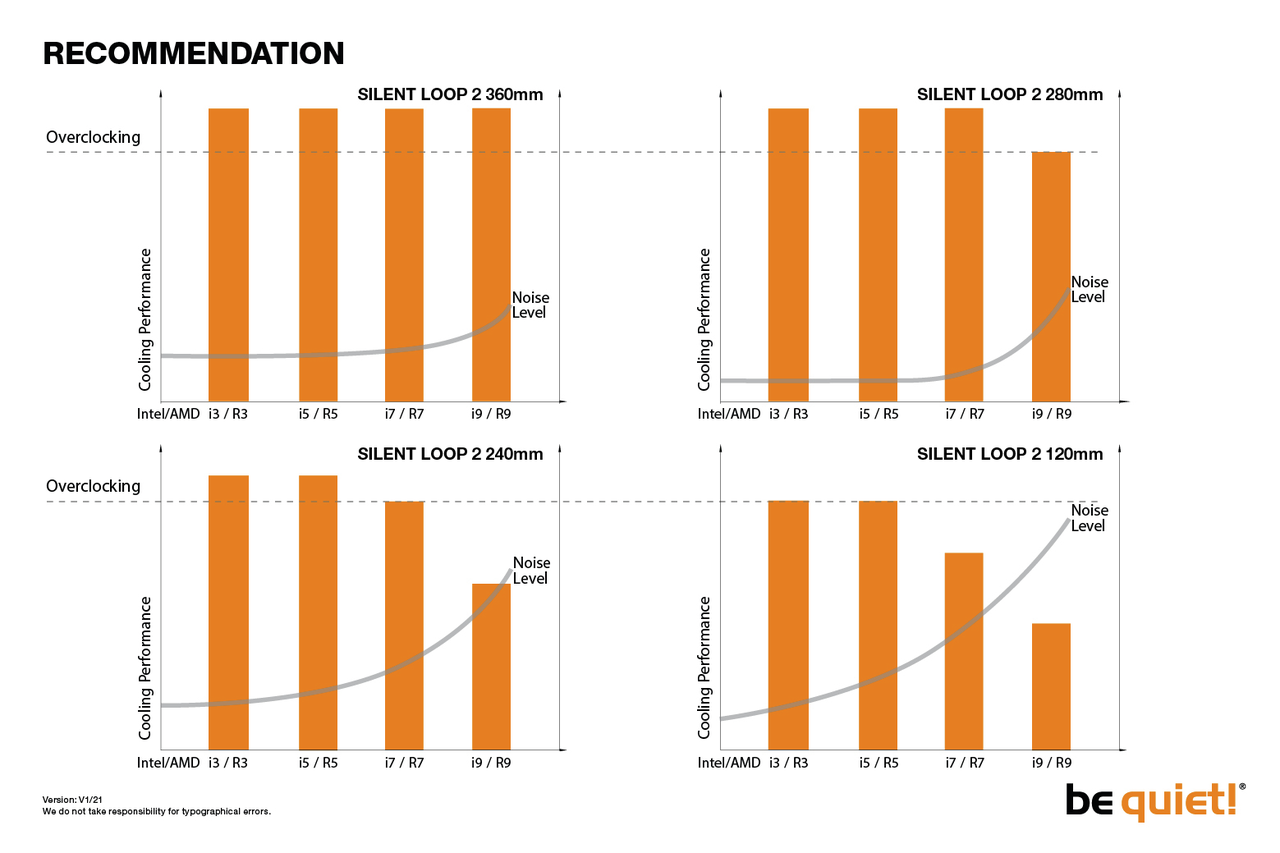
The closest to a concrete guideline I could find was the infographic in Figure 3 provided by Be quiet! on their Silent Loop 2 cooler’s web page11. The graph shows the performance and noise level of different sizes of the Silent Loop 2 cooler when coupled with different tiers of processors. As no units are given on the y-axis, no concrete information can be extracted from the graphs. However, it seems clear that a 280mm cooler is viewed as the minimum for a Ryzen 9 processor, with a 360mm seemingly being recommended. I was able to confirm this impression by analyzing multiple other computer builds online.
Having settled on a target cooler size, I spent a lot of time sifting through multiple lists ranking different coolers on the market, as well as reading and watching reviews about them. The following three coolers stood up as clear winners and finalists for my build. I believe each one of them can find its place in a high-performance water-cooled setup.
Arctic Liquid Freezer II
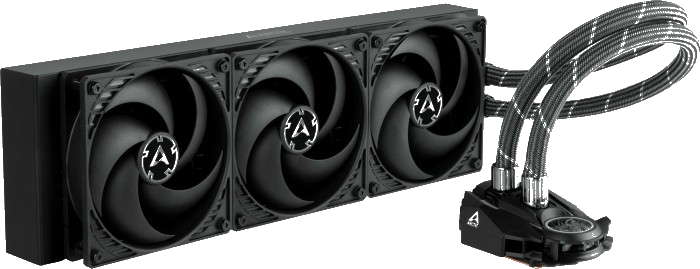
As of this writing, this is arguably one of the most popular liquid coolers out there. This is probably in huge part due to Gamer Nexus’s glowing video review. The biggest peculiarity of this cooler is its implementation of an extra fan mounted on the pump block which sits on top of the CPU. This fan provides extra airflow for the VRMs block, which resulted in a measurable reduction of its temperature12.
- Helpful reviews: AnandTech, Basic-Tutorials, Gamers Nexus.
- Pros: Great performance, relatively low price, six year warranty.
- Cons: The biggest turn-off for me regarding this cooler was an apparent issue with the cooler’s AM4 mounting brackets13. The provided brackets would cause the cooler to push against some board’s VRMs and/or the M.2 slot closest to the CPU, sometimes making it impossible to secure the cooler to the motherboard. Arctic Liquid became aware of the issue and published an article about it in their user forum13. Another issue was the presence of three different revisions of the cooler on the market, with some of them not being compatible with some AM4 motherboards, and one revision suffering from missing AM4 screws13. To make things worse, there was no assurance as to which revision would be delivered when ordering from a third-party distributor. Finally, it seems the cable used to wire the fans on the radiator block is slightly short, possibly requiring an additional 4-pin PWM extension cable12.
The cons sadly outweighed the pros for me, and I reluctantly steered clear of the Arctic Liquid Freezer II.
NZXT Kraken series
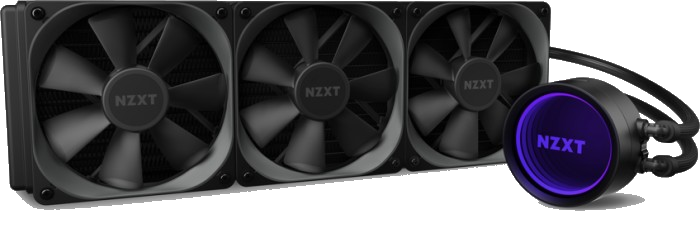
The Kraken series coolers held a respectable place at the top of multiple ranking lists of CPU water coolers. The biggest attraction for me was the stunning design, which I find to be very eye-catching. The Kraken series encompasses two lines of products: the X coolers which come with an Infinity Mirror design mounted on the pump block, and the Z coolers, which have a programmable LCD display instead. The Z coolers’ screen can be used to display the CPU/GPU temperatures, fan speeds, or any image programmed by the user.
- Helpful reviews: AnandTech, Basic-Tutorials, Gamers Nexus video review.
- Pros: A very beautiful design. Performance-wise and noise-level-wise these coolers seem to be pretty run of the mill, their scores placing them in the average to above average range. NZXT offers a 6 year warranty on the Kraken series coolers.
- Cons: The NZXT CAM software used to control the cooler’s display and control the cooler’s fan curves is only available on Windows. To make things worse, it seems this program attempts to update the cooler’s firmware on startup, without prompting the user for any confirmation14. I find this to be very bad implementation at best, and possibly malicious behavior at worse. Looking around for free software alternative, I did find liquidctl, a cross-platform CLI tool to control AIO liquid coolers and other devices, which has support for NZXT’s Kraken coolers. However, with such projects, it sadly remains uncertain how long such support can last. Additionally, I did come across some reports of Kraken coolers pump units being very noisy, it is unclear to me however, whether that was due to non optimal mounting. Finally, these coolers are ridiculously overpriced.
As much as I appreciate the beauty of the design, I would only pay-up the price-tag for such coolers if I had more money than sense.
Be quiet! Silent Loop 2
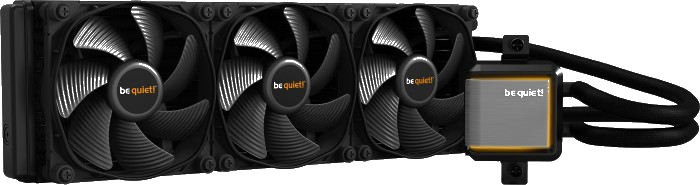
I looked into the Be quiet! coolers because of the company’s reputation for high quality, low noise computer components (coolers, cases, fans, and power supplies). In particular, the company’s Silent Wings 3 fans are some of the most popular in low-noise computer builds.
As I have come to learn, water coolers might not Be quiet!’s Forte. As of this writing, the company maintains two lines of coolers: Pure Loop, which is the lower budget series, and Silent Loop advertised to be the “Premium” option. There exists two models in the Silent Loop line, the latest of the two being the Silent Loop 2, itself is an iteration of the previous Silent Loop cooler. The Silent Loop was the company’s first attempt at water cooling back in 201615. However, the cooler shortly ended up being discontinued by Be quiet! after multiple reports of high pump noise, rattling, vibrations and eventual failure. Additionally, Be quiet!’s FAQ page mentions the possibility of leaks occurring “on very rare occasions” on this cooler16. Be quiet!, to its merit, was very frank about these defects. The Silent Loop 2 was presented by the company as a comeback, and a product in which multiple lessons learned from previous mistakes were implemented15.
- Helpful reviews: Guru3D, EnosTech, KitGuruTech video review.
- Pros: This is not a pro for the cooler itself but for the company. I find the way Be quiet! handled the issues with their first Silent Loop cooler to be exemplary. The company was very frank about their previous mistakes, and seems to have learned from them and improved upon them in their updated cooler design. On paper, the pump seems to be very quiet, and the cooler uses Silent Wings 3 fans for low noise output. The radiator includes an opening which can be used to refill the loop and prolong its lifetime. This feature was actually a rare find among other coolers I considered. Be quiet! includes a cooling liquid refill bottle, which the company recommends to use after two years of usage to counter permeation out of the loop. Finally, a very big advantage for me was the ability for manual control of the pump’s RGB with a provided wired controller.
- Cons: Surprisingly, I managed to find few reports online of people complaining about the cooler’s noise level. To be fair, The company seems to be very responsive in such cases, and to offer free replacements to affected users. Another disadvantage I found, was the cabling at the pump level being a bit excessive. Additionally, I am not fan of the LED design Be quiet! went with. Finally, the relatively short warranty period of only 3 years, compared to an average of 5 years from other manufacturers I looked up, was not very attractive.
Where to go from here?
Although I had set myself to find a liquid cooler for my build, looking into actual models made me realize the following:
- Liquid coolers come with an intrinsic expiration date: This is due to the cooling liquid permeating out of the system. This permeation causes the liquid to escape the cooler loop thus reducing its efficiency (although at a very low rate). This explains the limited warranties on these coolers compared to air coolers, and the refill recommendation by some manufacturers. This is less of a noticeable problem in custom loops as they are easier to refill. However, as I have discussed, a custom loop is not what I am going for.
- Liquid coolers come with more moving parts and more possible points of failure: The pump, the tubing, the radiator, are all additionally parts (on top of the fans) which can cause the system to fail. In the case of an air coolers a failure would simply lead the CPU to heat up until it thermo-throttles and turns itself off, at which point, the failure can be easily diagnosed. In contrast, a liquid cooler failure can, in the worst case scenario, cause liquid to spill all over the computer’s component thus possibly damaging them. To be fair, most AIO systems use distilled water which has low electric conductivity, but the risk remains.
- Liquid coolers do not necessarily have a lower noise level than air coolers: This was perhaps my biggest misconception. Here are the facts: Liquid coolers have a higher thermal capacity than air coolers, due to the liquid in the loop having a higher heat capacity than air17. This means that it takes more energy to raise the temperature of the cooler liquid by one degree than it takes to do the same for air. Ultimately, this means that the fans in a liquid cooler will usually spin-up much later than they do in the case of an air cooler, thus achieving a lower perceived noise level. However, this lower noise output would be expected for bursty CPU loads only. In the case of longer loads, the cooler liquid’s temperature will rise, at which point its higher heat capacity will play against it, as it would take the fans more energy to lower its temperature. Another contributor to a liquid cooler’s overall noise level is the pump. Although, pumps are usually well insulated to reduce their noise level, as mentioned in the previous section, during my online search, I came across multiple reports of very noisy pumps. A pump’s noise level also increases if air becomes trapped within it, usually due to a non-optimal mounting.
For the reasons above, I reconsidered my initial resolution to go with a liquid cooler, and changed my target to finding an air cooler. My main motivation being that air coolers are cheaper, arguably less noisy, and less prone to failure. Before moving to the air coolers section, I would like to link to this very educational Gamers Nexus video which explains a lot about AIO mounting configurations and common mistakes thereof. Had I gone with an AIO system, I would have used a lot of the tips mentioned in that video.
Air coolers
Looking for an air cooler this time around, I simply aimed for the top of the line. I also allowed myself to look at the more expensive end of the spectrum because compared to the water coolers I had considered so far, air coolers were clearly less expensive.
With that being said, One cooler clearly stood out of the rest for me:
Be quiet! Dark Rock Pro 4

Dark Rock is Be quiet!’s high-end line of products, and combines great performance with inaudible noise levels. As can be seen from Figure 718, the cooler has two fans, the first one present on the front and working in a push configuration, the other being sandwiched between the two-way-split heat sink.
- Pros: The cooler is advertised to be oriented for overclocking and high-performance workstations. In fact, it boasts a whopping 250W TDP capacity which should be enough for my intended purposes. Finally, the Silent Wings fans used in the cooler are rated at a noise level of 24.3dB(A) at full speed (as a reference a whisper has a noise level of 30dB19)
- Cons: Figure 7 truly does not do the sheer size of this cooler justice. The full dimensions of the cooler are
WxHxL=136x163x146mm. In particular, the height will require special attention when it comes time to pick a case for the build. Another inconvenience that comes with such a big footprint, is the limitations on the RAM height. In this case, the cooler with front mounted fan, will limit my choice of RAM sticks, to those not higher than 40mm20
Having finally settled on a cooler, it was now time to look into the case which would host all my components.
Case
My requirement for the case were very simple. In order of importance these were:
- Large enough dimensions to house the Dark Rock Pro 4 cooler.
- Enough space to house two full length graphic cards: As I have mentioned in the previous installment of this series, one important use-case for my setup is gaming using PCI-passthrough.
- As compact and as simple a design as possible: This point goes in the opposite direction of the previous two, and makes it all the harder to find the perfect candidate.
- Airflow is a priority: As high-end as the cooler I chose for my build is, if the case’s airflow is mediocre, so will be the cooler’s performance. As such I want a case with a completely open front panel, for maximum airflow.
- Good front I/O: At least two USB type-A ports (for the occasional bootable USB creation, and phone connection). Front audio ports are also a must, preferably split audio out/microphone in, but a combo port is not the end of the world.
- Space for 2x3.5” HDD bay: For possible on-board RAID 1 backup.
In Table 1, I have gathered relevant information of cases that made it to my final candidates list.
 |  |  |  | |
|---|---|---|---|---|
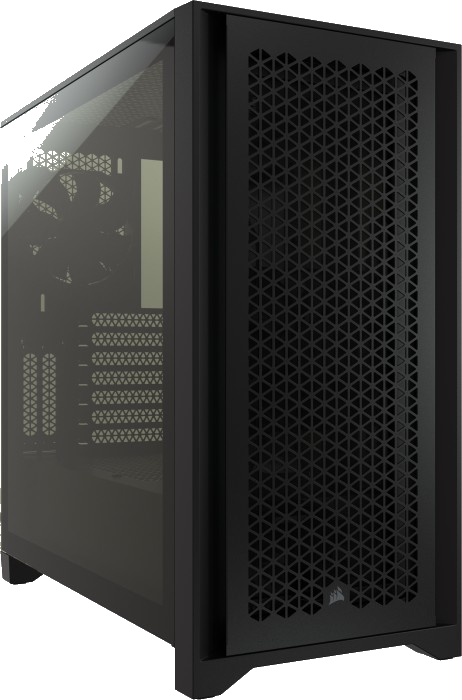
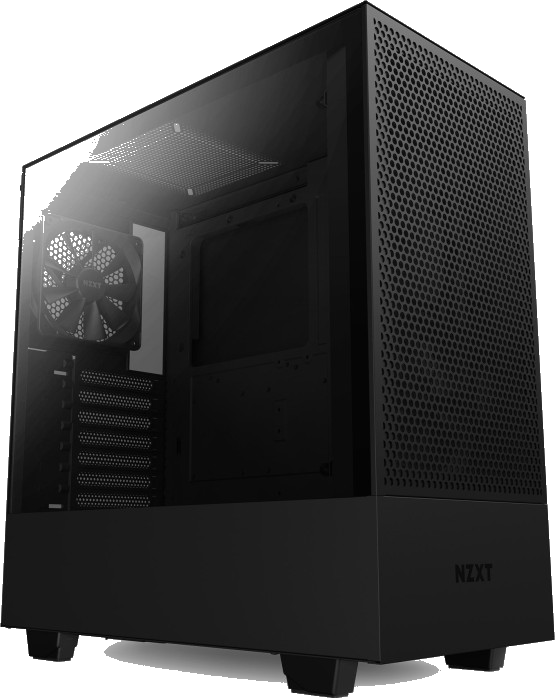
| Manufacturer Model | Fractal Design Meshify C | Fractal Design Meshify 2 Compact | Corsair 4000D Airflow | NZXT H510 Flow |
| Dimensions (LxHxW in mm) | 212x440x395 | 210x475x424 | 230x466x453 | 210x460x428 |
| Volume (L) | 36.50 | 42.29 | 48.55 | 41.34 |
| Included fans | 2x 120mm | 2x 140mm 1x 120mm | 2x 120mm | 2x 120mm |
| Front I/O | 2x USB-A 3.0 1x Microphone 1x Audio | 1x USB-C 3.1 2x USB-A 3.0 1x Mic 1x Audio | 1x USB-C 3.1 1x USB-A 3.0 1x Mic/Audio combo | 1x USB-C 3.1 1x USB-A 3.0 1x Audio |
| Front radiator space (mm) | (1x, 2x, 3x) 120 (1x, 2x) 140 | (1x, 2x, 3x) 120 (1x, 2x) 140 | (1x, 2x, 3x) 120 (1x, 2x) 140 | (1x, 2x) 120 (1x, 2x) 140 |
| Top radiator space (mm) | (1x, 2x) 120 (1x, 2x) 140 | (1x, 2x) 120 (1x, 2x) 140 | (1x, 2x) 120 (1x, 2x) 140 | - |
| HDD cage | 2 x 3,5’ | 2 x 3,5’ | 2 x 3,5’ | 2 x 3,5’ |
| PSU max depth With/Without HDD cage | 175mm | 165mm/200mm | 180mm/220mm | - |
| CPU Cooler max height | 172mm | 169mm | 170mm | 165mm |
| Gfx card max length With/Without front fans | 315mm | 341mm/360mm | 360mm | 360mm |
Having spent a lot of time going through this list of final candidates and comparing their different features, I eventually settled on the following case:
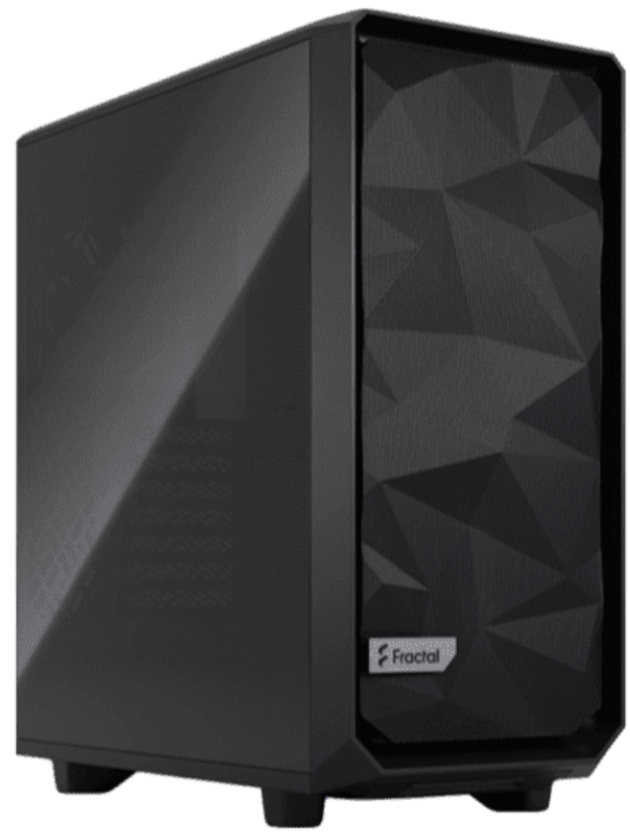
Fractal Design Meshify 2 Compact
The Meshify 2 Compact is positioned as Fractal Design’s iteration on the previous Meshify C case. In comparison to its predecessor, the Meshify 2 Compact has a slimmer and taller profile, and is delivered with three fans: 2x140mm for intake on the front panel, and 1x120mm for exhaust on the back panel.
- Pros:
- The top panel is completely removable allowing easier installation of fans or radiator blocks.
- The front panel is mounted on a hinge which allows easy access to elements mounted on it. Additionally, the front filter is removable, to allows for better airflow if needed.
- The IO panel is attached to the top of the chassis instead of the front panel, allowing the removal of the front panel without worry about any dangling cables.
- The IO panel comes with a USB type-C port, in addition to two USB-type A ports. This was actually rare enough to come-by.
- Cons:
- The PSU shroud might get slightly crammed if I end up using the provided HDD cage alongside a large ATX power supply unit. In particular, the case manual specifies a maximum PSU length of 165mm or 200mm depending on whether the HDD case is mounted or not. This is something I need to keep in mind when looking into PSUs later.
- Another aspect in which the compact design of the case works against it, is in the supported maximum length of the graphics cards. Here too, depending on whether a front radiator is mounted or not, the maximum GPU length is 341mm or 360mm. As I am not planning on using any water cooling anymore, this is not an issue for me, it just limits any possible future upgrades I might want to undertake in the future.
For a very complete review of the case, I can only recommend Gamers Nexus’ video.
Conclusions
I had planned to cover the majority of remaining components in this second part, but the discussion about the power metrics and different turbo technologies ended up taking longer than I had anticipated. Even at that, our discussion here didn’t even scratch the surface of those two topics.
Power consumption calculation is becoming a more complicated topic as power dissipation effects, previously negligible, are having a more noticeable effect due to the ever finer lithography processes in use by CPU manufacturers. Additionally, power management algorithms, turbo included, are only getting smarter and more complex. Trying to understand these algorithms, is rendered even harder by the fact that they remain closely guarded secrets, with only surface-level information being shared by the manufacturers. I do hope this write-up, however incomplete, helps elucidating some of the misunderstandings surrounding both topics, and guides your choice in finding the perfect cooler for your build.
Finally, in contrast to the CPU cooler section, I didn’t have much to say about my choice of a case, hence the brevity of the discussion there. I hope Table 1 can remain helpful for anyone with similar requirements to mine.
In the next installment, we will hopefully be looking at the final components of the build. If that discussion does not last as much as the one here, perhaps we will also get to take a look at the final assembled product. Until then!
References
AnandTech: AMD Zen 3 Ryzen Deep Dive Review: 5950X, 5900X, 5800X and 5600X Tested ↩ ↩2
AnandTech: Why Intel Processors Draw More Power Than Expected: TDP and Turbo Explained ↩ ↩2
Tom’s Hardware: Intel Reveals PL1, PL2 and Tau Values For 10th-Gen Comet Lake-S Processors ↩
AnandTech: Reaching for Turbo: Aligning Perception with AMD’s Frequency Metrics ↩ ↩2 ↩3
AnandTech: The AMD 3rd Gen Ryzen Deep Dive Review: 3700X and 3900X Raising The Bar ↩
Gamers Nexus: Explaining AMD Ryzen Precision Boost Overdrive (PBO), AutoOC, & Benchmarks ↩ ↩2
AMD on Youtube: 2nd Gen AMD Ryzen™ Processors: XFR 2 and Precision Boost 2 ↩
Tom’s Hardware: AMD Introduces Precision Boost Overdrive 2, Boosts Single Thread Performance ↩
Gamers Nexus: The Basics of Case Fan Noise, Airflow, and Quieter Gaming ↩
Gamers Nexus: Arctic Liquid Freezer II Cooler Review: New Best-Performer for CPU & VRM Thermals ↩ ↩2
[Internet Archive: 07.01.2021] Arctic Blog: Liquid Freezer II Revision 3 Mounting issues ↩ ↩2 ↩3
Gamers Nexus on Youtube: NZXT Kraken X63 Cooler Review: Efficient Cooling & CAM Woes ↩
Be quiet! on Youtube: Silent Loop 2: We’ve learned from our mistakes ↩ ↩2